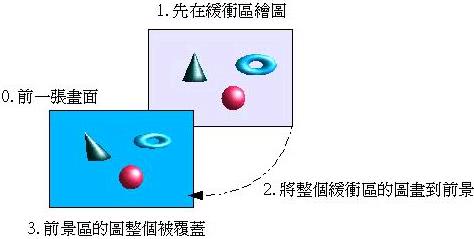
如果我們要繪製的圖形很多時,在動畫製作時,如果直接畫在前景上,可能會發生圖形一個一個顯現出來的畫面,讓整個畫面不完整呈現。
這時候可使用雙緩衝區(double-buffer)的方法,要準備兩個繪圖物件,其中一個是前景區,也就是您所看到的畫面,另一個繪圖物件您看不到,在 畫面準備好之前,所有的圖形先繪製在您看不到的畫面,當所有的圖形都繪製完畢,再將所有的圖形繪製到前景,此時前景會整個被後繪圖區所覆蓋,完成一次畫面 的播放,下圖為簡單的示意圖:

實作雙緩衝區的方法依所使用的API而有所不同,在Java中可以用Image物件來完成,而在使用DirectDraw時,可以使用 Surface來建立,下面這個程式是使用Java來製作,這個程式是至今所有文件內容驗收,包括了頂點配置、索引陣列、動畫、雙緩衝區等等,您可以先觀 看結果:一個繞Y軸旋轉的空心立方塊。
- DoubleBuffer.java
package cc.openhome;

import javax.swing.JApplet;
import java.awt.*;


// 立方體類別
class Point {
    public final double x, y, z;
    public Point(double x, double y, double z) {
        this.x = x;
        this.y = y;
        this.z = z;
    }
}
class Cubic {
    public final static int NFC = 6;        // 平面數量
    public final static int NVT = 8;        // 頂點的數量
    public final static int NVT_F = 4;        // 1個平面的頂點數

    public Point[] vt;   // 頂點的座標
    public int[][] ord;    // 頂點索引

    public Cubic(int r) {
        vt = new Point[NVT];
        double sq3 = Math.sqrt(3.0);
        vt[0] = new Point(r / sq3, r / sq3, r / sq3);
        vt[1] = new Point(r / sq3, r / sq3, -r / sq3);
        vt[2] = new Point(-r / sq3, r / sq3, -r / sq3);
        vt[3] = new Point(-r / sq3, r / sq3, r / sq3);

        for (int i = 0; i < NVT / 2; i++) {
            vt[NVT / 2 + i] = new Point(-vt[i].x, -vt[i].y, -vt[i].z);
        }

        int[][] initOrd = {{0, 1, 2, 3}, {0, 3, 5, 6}, {0, 6, 7, 1},
            {4, 7, 6, 5}, {4, 2, 1, 7}, {4, 5, 3, 2}};

        ord = new int[NFC][NVT_F];
        for (int i = 0; i < NFC; i++) {
            for (int j = 0; j < NVT_F; j++) {
                ord[i][j] = initOrd[i][j];
            }
        }
    }
}

public class DoubleBuffer extends JApplet implements Runnable {

    private Image offScreen;
    private Graphics gOffScreen;
    private int orgX, orgY;
    private Cubic cubic = new Cubic(100);

    public void init() {
        setBackground(Color.black);
        orgX = getWidth() / 2;
        orgY = getHeight() / 2;
        offScreen = createImage(getWidth(), getHeight());
        gOffScreen = offScreen.getGraphics();
        gOffScreen.setColor(Color.yellow);
    }

    public void start() {
        (new Thread(this)).start();
    }

    public void run() {
        // 旋轉以斜角繪製圖形
        double sinAx = Math.sin(Math.toRadians(30));
        double cosAx = Math.cos(Math.toRadians(30));

        double[] cosAys = new double[360];
        double[] sinAys = new double[360];
        for (int i = 0; i < 360; i++) {
            cosAys[i] = Math.cos(Math.toRadians(i));
            sinAys[i] = Math.sin(Math.toRadians(i));
        }

        int angle = 330;
        double sinAy = sinAys[angle];
        double cosAy = cosAys[angle];

        Point[] tp = new Point[4];
        int[] px = new int[4];
        int[] py = new int[4];
        // 動畫迴圈
        while (true) {
            gOffScreen.clearRect(0, 0, getWidth(), getHeight());
            for (int i = 0; i < Cubic.NFC; i++) {
                for (int j = 0; j < Cubic.NVT_F; j++) {
                    // 利用索引array取出正確的頂點
                    tp[j] = cubic.vt[cubic.ord[i][j]];

                    // 旋轉以斜角繪製圖形
                    px[j] = (int) (tp[j].x * cosAy + tp[j].z * sinAy);
                    py[j] = (int) (tp[j].y * cosAx -
                            (-tp[j].x * sinAy + tp[j].z * cosAy) * sinAx);
                    px[j] = px[j] + orgX;
                    py[j] = -py[j] + orgY;
                }

                // 在緩衝區上縮圖
                gOffScreen.drawPolyline(px, py, 4);
            }
            repaint();  // 重繪畫面
            // 暫停 20 毫秒
            try {
                Thread.sleep(20);
            } catch (InterruptedException e) {
                e.printStackTrace();
            }
            // 繞 y 軸轉動
            angle = (angle + 1) % 360;
            sinAy = sinAys[angle];
            cosAy = cosAys[angle];
        }
    }

    // 重新定義update()
    public void update(Graphics g) {
        paint(g);
    }

    public void paint(Graphics g) {
        // 將緩衝區畫面繪到前景
        g.drawImage(offScreen, 0, 0, this);
    }
}
如果是HTML 5 Canvas的話,視所使用的API而定,可以有各種方式來實現雙緩衝區效果。例如,可以用兩個Canvas互換來達到雙緩衝區的效果。
以下是使用HTML5 Canvas的方式(如果瀏覽器支援HTML5 Canvas,例如最新版的Firexfox、Chrome、IE9等,可以直接將下面的內容存為HTML或按下檔名連結,直接載入瀏覽器執行觀看結果:
<!DOCTYPE html>
<html>
    <head>
        <meta content="text/html; charset=Big5" http-equiv="content-type">
        <script type="text/javascript">
            window.onload = function() {
                function toRadians(angle) {
                    return angle * Math.PI / 180;
                }

                var sin = Math.sin;
                var cos = Math.cos;
                var sqrt = Math.sqrt;

                function Point(x, y, z) {
                    this.x = x;
                    this.y = y;
                    this.z = z;
                }

                var V_INDEX = [
                    [0, 1, 2, 3], [0, 7, 6, 1], [4, 5, 6, 7],
                    [2, 5, 4, 3], [0, 3, 4, 7], [1, 6, 5, 2]
                ];

                var L = 100;
                var VETEX = [
                    new Point(L, L, L), new Point(L, -L, L),
                    new Point(L, -L, -L), new Point(L, L, -L),
                    new Point(-L, L, -L), new Point(-L, -L, -L),
                    new Point(-L, -L, L), new Point(-L, L, L)
                ];

                // 旋轉以斜角繪製圖形
                var ax = toRadians(30);
                var ay = toRadians(30);

                var sinAx = sin(ax);
                var cosAx = cos(ax);
                //var sinAy = sin(ay);
                //var cosAy = cos(ay);

                var cosAys = [];
                var sinAys = [];
                for(var i = 0; i < 360; i++) {
                    cosAys[i] = cos(toRadians(i));
                    sinAys[i] = sin(toRadians(i));
                }

                var angle = 330;
                var sinAy = sinAys[angle];
                var cosAy = cosAys[angle];

                var px = [];
                var py = [];

                var canvas1 = document.getElementById('canvas1');
                var canvas2 = document.getElementById('canvas2');

                var orgX = canvas1.width / 2;
                var orgY = canvas1.height / 2;

                var context1 = canvas1.getContext('2d');
                var context2 = canvas2.getContext('2d');

                // 先繪製背景
                var context = context2;
                setTimeout(function() {
                    context.beginPath();
                    for(var i = 0; i < 6; i++) {
                        for (var j = 0; j < 4; j++) {
                            // 利用索引陣列取出正確的頂點
                            var v = VETEX[V_INDEX[i][j]];
                            // 旋轉以斜角繪製圖形
                            px[j] = parseInt(
                                      v.x * cosAy + v.z * sinAy + orgX);
                            py[j] = parseInt(v.y * cosAx -
                              (-v.x * sinAy + v.z * cosAy) * sinAx + orgY);
                        }
                        context.moveTo(px[0], py[0]);
                        for(var k = 1; k < 4; k++) {
                            context.lineTo(px[k], py[k]);
                        }
                    }
                    context.clearRect(0, 0, canvas1.width, canvas1.height);
                    context.stroke();

                    // 置換Canvas與Context
                    if(context === context2) {
                        document.body.replaceChild(canvas1, canvas2);
                        context = context1;
                    }
                    else {
                        document.body.replaceChild(canvas2, canvas1);
                        context = context2;
                    }

                    // 繞 y 軸轉動
                    angle = (angle + 1) % 360;
                    sinAy = sinAys[angle];
                    cosAy = cosAys[angle];

                    setTimeout(arguments.callee, 20);
                }, 20);
            };
        </script>
    </head>
    <body>
        <canvas id="canvas1" width="640" height="480"></canvas>
        <canvas id="canvas2" width="640" height="480"></canvas>
    </body>
</html>
