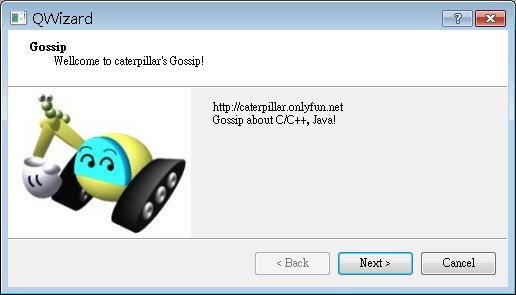
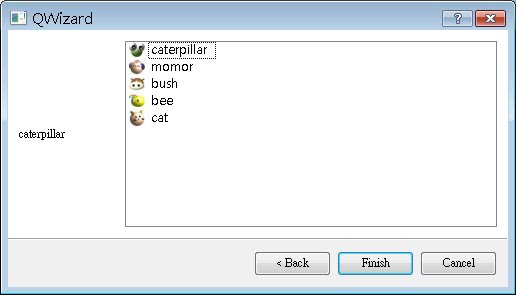
在應用程式安裝或是使用者註冊、設定時,可以提供使用者「精靈」(Wizard)進行一些選項設定與資訊填寫,在Step by Step的過程中,提示使用者完成所有必要的選項設定或資訊填寫,精靈可以使用QWizard類別來提供這個功能。
QWizard中每一步的畫面,都是一個QWizardPage物件,一個QWizardPage可以進行元件置放、設定版面管理、設定浮水印圖片、LOGO圖片、標題、副標題等。
下面這個程式是個簡單的示範,程式中將用QWizard建立有兩個頁面步驟的精靈:
#include <QApplication>
#include <QLabel>
#include <QWizard>
#include <QWizardPage>
#include <QHBoxLayout>
#include <QListWidget>

QWizardPage *createWelcomePage() {
    QWizardPage *page = new QWizardPage;
    page->setTitle("Gossip");
    page->setSubTitle("Wellcome to caterpillar's Gossip!");
    page->setPixmap(QWizard::WatermarkPixmap, QPixmap("caterpillar.jpg"));

    QHBoxLayout *layout = new QHBoxLayout;
    layout->addWidget(
      new QLabel("http://caterpillar.onlyfun.net<br>Gossip about C/C++, Java!"));
    page->setLayout(layout);

    return page;
}

QWizardPage *createListPage() {
    QWizardPage *page = new QWizardPage;

    QLabel *label = new QLabel;
    label->setFixedWidth (100);

    QListWidget *listWidget = new QListWidget;
    listWidget->insertItem(0, new QListWidgetItem(
                   QIcon("caterpillar_head.jpg"), "caterpillar"));
    listWidget->insertItem(1, new QListWidgetItem(
                   QIcon("momor_head.jpg"), "momor"));
    listWidget->insertItem(2, new QListWidgetItem(
                   QIcon("bush_head.jpg"), "bush"));
    listWidget->insertItem(3, new QListWidgetItem(
                   QIcon("bee_head.jpg"), "bee"));
    listWidget->insertItem(4, new QListWidgetItem(
                   QIcon("cat_head.jpg"), "cat"));

    QObject::connect(listWidget, SIGNAL(currentTextChanged (const QString &)),
                     label, SLOT(setText(const QString &)));

    QHBoxLayout *layout = new QHBoxLayout;
    layout->addWidget(label);
    layout->addWidget(listWidget);

    page->setLayout(layout);

    return page;
}

int main(int argc, char *argv[]) {
    QApplication app(argc, argv);

    QWizard *wizard = new QWizard;
    wizard->setWindowTitle("QWizard");

    wizard->addPage(createWelcomePage());
    wizard->addPage(createListPage());

    wizard->show();

    return app.exec();
}
QWizardPage的setTitle()與setSubTitle()分別用來設定標題與副標題,而setPixmap ()用來設定顯示在畫面中的圖片,圖片的顯示方式有浮水印(WatermarkPixmap)、LOGO(LogoPixmap)、橫副 (BannerPixmap)、背景(BackgroundPixmap)等方式,在精靈頁面中的顯示的位置各不相同,可以參考Qt線上文件中 QWizard的說明。
程式中的精靈有兩個頁面,在過程中可以按「Next」進入下一個頁面,如果是最後一個頁面,則會顯示「Finish」按鈕,下圖是執行的的參考畫面:


